Run Amazon Linux on your infrastructure

Boardgame
French soldiers, on the front lines, promise each other that they’ll survive to come back all together no matter what happens. Without ever touching on the warlike aspect, “The Grizzled” offers each player the chance to feel some of the difficulties suffered by the soldiers in the trenches. Thus the emotions around the table will often be intense.
The Grizzled is a cooperative game about survival in the trenches during the first World War where players win or lose together.Players take turns either playing cards from their hand, representing threats like mortar shells or negative personality traits, or opting out of the mission. Successful progress depends on correctly playing threat cards. Too many occurrences of a threat result in mission failure, highlighting the need for planning, teamwork, and a touch of luck. For more information, visit: boardgamegeek
There is still a significant demand for running services on virtual machines. In the realm of the AWS cloud, utilizing AWS EC2 emerges as the prime choice for VM deployment. AWS offers a wide array of Amazon Machine Images (AMIs) suitable for installation on EC2 instances. However, AWS also presents a tailored Linux AMI known as Amazon Linux, which is crafted to furnish a stable, secure, and high-performance execution environment for applications hosted on EC2.
Setting up an Ubuntu machine on a personal computer or a homelab server is a straightforward process. One simply needs to download the appropriate image tailored to their virtualization environment and initiate the VM. However, the question arises: How does one setup AWS Linux locally, facilitating testing and exploration of the image without incurring the additional expense of provisioning an EC2 instance on AWS?
This blog post elucidates the steps required to configure AWS Linux within your local environment, thereby obviating the need for EC2 provisioning and facilitating cost-effective experimentation and testing.
Amazon Linux
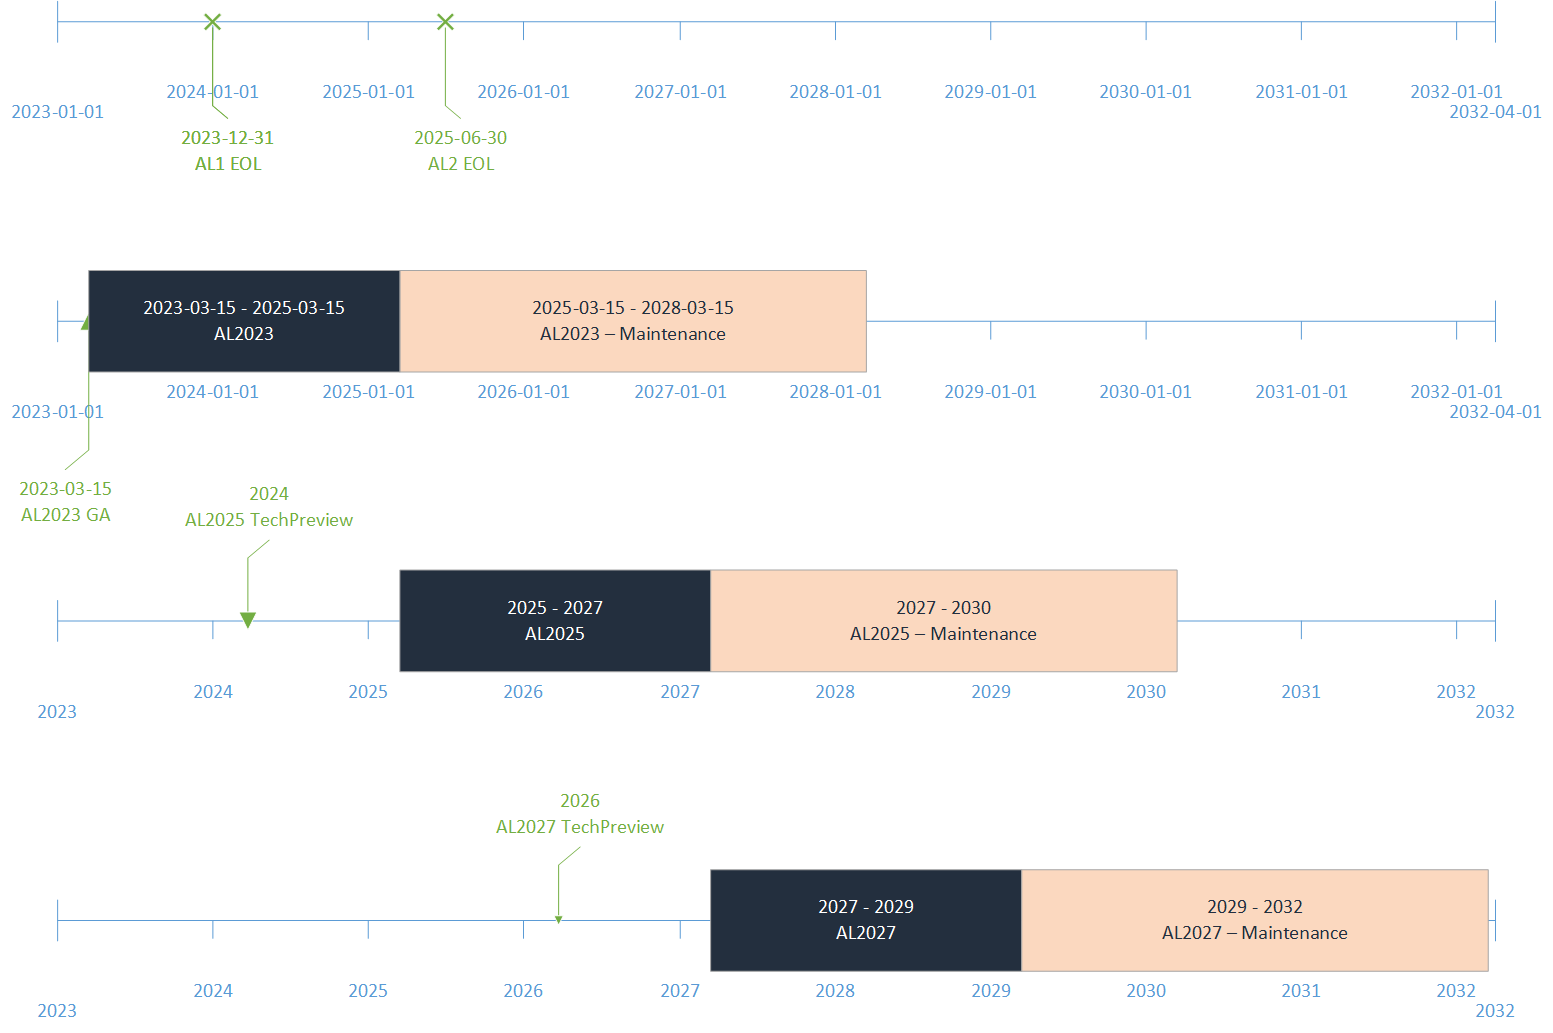
Amazon Linux is an operating system provided by AWS. It incorporates the latest enhancements from the Linux community as well as long-term support from AWS. It fully supports AWS EC2 features and is tightly integrated with AWS services. Since 2011, AWS has introduced different releases. The initial release, called Amazon Linux AMI (Amazon Linux 1),and it reached its end of life in December 2023. Following that, Amazon Linux 2, the subsequent version, published on 2018 and will reach its end of life in June 2025. AWS has adopted a naming convention for its operating system versions based on the year of release. So, the latest version is referred to as Amazon Linux 2023. The below diagram published in an AWS blog post, illustrates the lifecycle of Amazon Linux distributions.
Let's look at the latest release Amazon Linux 2023 (AL2023). AL2023 maintains its own release and support life cycles independent of Fedora. AWS claims that AL2023 isn't directly comparable to any specific Fedora release. The AL2023 GA version includes components from Fedora 34, 35, and 36. Some of the components are the same as the components in Fedora and some are modified. Other components more closely resemble the components in CentOS 9 Streams or were developed independently. AL2023 is based on Linux 6.1 kernel, and contains a customized version of cloud-init.
Cloud-init
Managing and setting up cloud instances and servers can prove to be intricate and time-consuming. Cloud-init, an open-source initialization tool, was created to simplify the process, enabling swift setup of systems tailored to your specifications with minimal effort. Without the concept of cloud-init, we could certainly attempt to embed configurations into the image. However, this approach often results in a multitude of disparate images that require ongoing maintenance.
Cloud-init can handle a range of tasks that normally happen when a new instance is created. It’s responsible for activities like setting the hostname, configuring network interfaces, creating user accounts, and even running scripts. This streamlines the deployment process; your cloud instances will all be automatically configured in the same way, which reduces the chance to introduce human error.
Cloud-init operates in two distinct phases throughout the boot process. The initial phase occurs early, before networking is activated, while the subsequent phase takes place later, after cloud-init has implemented the networking configuration. The diagram below summarizes the functionalities of cloud-init:
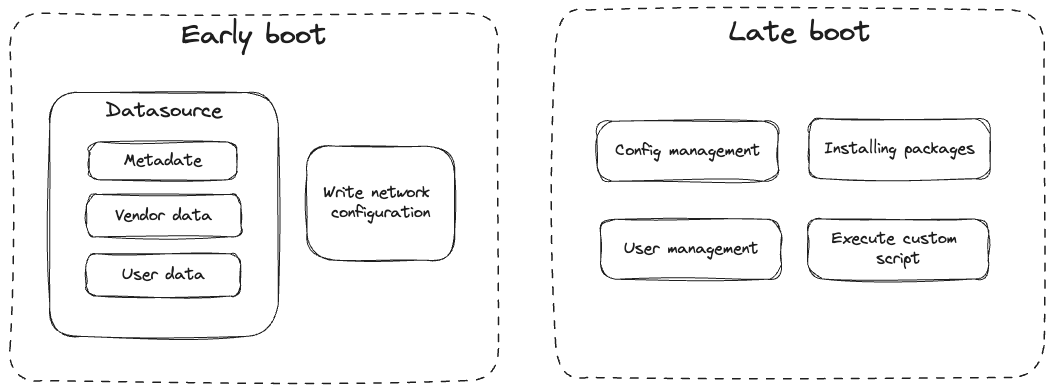
Cloud-init retrieves configuration data from a datasource, which instructs it on the necessary actions to undertake. This data typically comprises metadata, vendor data, and/or userdata. Metadata encompasses essential instance details such as hostname, machine ID, and network configuration. Cloud-init processes this metadata, caching and exposing it as a standardized and versioned JSON object known as instance-data.
Vendor data, furnished by the cloud provider, facilitates hardware optimizations and enhances integration with the specific cloud platform. User data encompasses custom configurations for user management, SSH keys, and custom scripts that can be executed during the late boot stage. I recommend exploring cloud-init through the tutorial provided by the cloud-init team: Core tutorial with QEMU.
Run Amazon Linux locally
This structure includes steps to install both Amazon Linux 2 and 2023. During this tutorial, I use the VMware virtualization platform, but the steps are similar for different platforms.
NoCloud Datasource
The NoCloud datasource is a versatile option that offers flexibility and can be employed in various scenarios. Utilizing NoCloud, users can furnish both user data and metadata to the instance without the necessity of running a network service, or even without requiring a network connection altogether. Let's proceed by crafting sample metadata and user data containing essential configurations:
Sample metadata: Create a file named meta-data and add the following lines. You can easily replace the local hostname and network configurations:
local-hostname: aws_ami
network-interfaces: |
  auto eth0
  iface eth0 inet static
  address 10.10.10.124
  network 10.10.10.0
  netmask 255.255.255.0
  broadcast 10.10.10.255
  gateway 10.10.10.1
cloud-init network configuration provides mechanisms to match against the MAC address of the interface instead of specifying the interface name which can change depending on the VM configuration. for example,
eth0is the default network interface enabled Amazon Linux 2 andens192is the default network interface enabled Amazon Linux 2023 in the image. Network configuration are described in more details here: Network Configuration
[Optional] network-config: You may optionally add the network configuration in a separate file named network-config, which facilitates modular configuration. Review the configuration below, which can be utilized for Amazon Linux 2023:
version: 2
ethernets:
  ens192:
    addresses:
      - 10.10.10.124/24
    gateway4: 10.10.10.1
    nameservers:
      addresses: 10.10.10.1
Sample user-data: Create another file named user-data and insert the following lines. This configuration includes user settings and SSH authorization configurations. As an EC2 user, it's important to note that AWS Linux is configured with a pre-installed SSH service and configured for SSH key access only, with password login disabled. Therefore, I'm including my SSH public key in the user-data. Additionally, to simulate custom user-data during EC2 setup, I'm adding a simple script to demonstrate its functionality.
#cloud-config
users:
# A user by the name `ec2-user` is created in the image by default.
  - default
chpasswd:
  list: |
    ec2-user:< hashed_passwd: output from mkpasswd --method=SHA-512 --rounds=4096 >
# In the above line, do not add any spaces after 'ec2-user:'.
# NOTE: Cloud-init applies network settings on every boot by default. To retain network settings
# from first boot, add the following ‘write_files’ section:
write_files:
  - path: /etc/cloud/cloud.cfg.d/80_disable_network_after_firstboot.cfg
    content: |
      # Disable network configuration after first boot
      network:
        config: disabled
ssh_authorized_keys:
    - ssh-rsa AAAAB3NzaC1y*****

runcmd:
  - echo "Hello from my local AWS Linux" >> /etc/verify.out
Omission of default as the first item in the users list skips creation the default user. If no users key is provided the default behavior is to create the default user via this config.
Specifying a hash of a user’s password with passwd is a security risk if the cloud-config can be intercepted. SSH authentication is preferred.
The NoCloud cloud-init datasource can load an initial configuration from an ISO mounted in the Virtual Machine Guest CDROM drive. According to the Cloud-Init documentation, there are several methods to configure the datasource. Amazon Linux supports "local filesystem, labeled filesystem" configurations. To provide cloud-init configurations from the local filesystem, a labeled vfat or iso9660 filesystem containing user data and metadata may be used. For this method to work, the filesystem volume must be labelled CIDATA. Therefore, we need to create an ISO file containing the metadata and userdata. Follow the steps below to generate NoCloud cloud-init datasource called seed.iso:
As a Linux enthusiast, you have the option to utilize either mkisofs or genisoimage to generate the seed.iso file.
Looking at the
genisoimageman page, and themkisofsman page, There is really no difference.genisoimageis a carbon copy ofmkisofs.genisoimageis part of cdrkit, while mkisofs is part of cdrtools.
If you're using a Mac, you may employ the hdiutil command-line interface. Lastly, for Windows users, consider installing and utilizing AnyBurn: Check this blog for more information.
mkisofs -output seed.iso -volid cidata -joliet -rock user-data meta-data
If you have a separate network-config file:
mkisofs -output seed.iso -volid cidata -joliet -rock user-data meta-data network-config
If you're curious about the parameters just like me, here is the description:
-output: This option specifies the output file name for the generated ISO image. In this case, it's set to seed.iso.
-volid: This option sets the volume ID of the ISO image to cidata. The volume ID is essentially the name given to the ISO image when it's mounted.
-joliet: This option specifies that Joliet extensions should be used when creating the ISO image. Joliet is an extension to the ISO 9660 filesystem format that allows for long filenames.
-rock: This option specifies the use of the Rock Ridge Interchange Protocol, which is another extension to the ISO 9660 filesystem format. Rock Ridge allows for POSIX file permissions and longer filenames than the original ISO 9660 standard.
If you are interested in learning about AWS EC2 cloud-init datasource configuration, you can check here: Amazon EC2 Datasource
Amazon Linux VM image
At the time of writing this blog, Amazon Linux virtualization images for on-premises supports the following virtualization platforms:
| VMware vSphere | KVM | Oracle VirtualBox | Microsft Hyper-V | Container | |
|---|---|---|---|---|---|
| Amazon Linux 2 | ✓ | ✓ | ✓ | ✓ | ✓ |
| Amazon Linux 2023 | ✓ | ✓ | ✓ |
You can view the list of supported platforms and download the correct VM image from the below links:
Amazon Linux 2
Amazon Linux 2023
Boot the VM
So far, we have discussed the NoCloud Datastore of cloud-init and the provision of the Amazon Linux VM image. Depending on your virtualization platform, the specific steps may vary. In general, you'll need to load the downloaded image, mount the seed.iso, and then boot the virtual machine. Here, I will provide steps for booting and connecting to Amazon Linux on VMware vSphere.
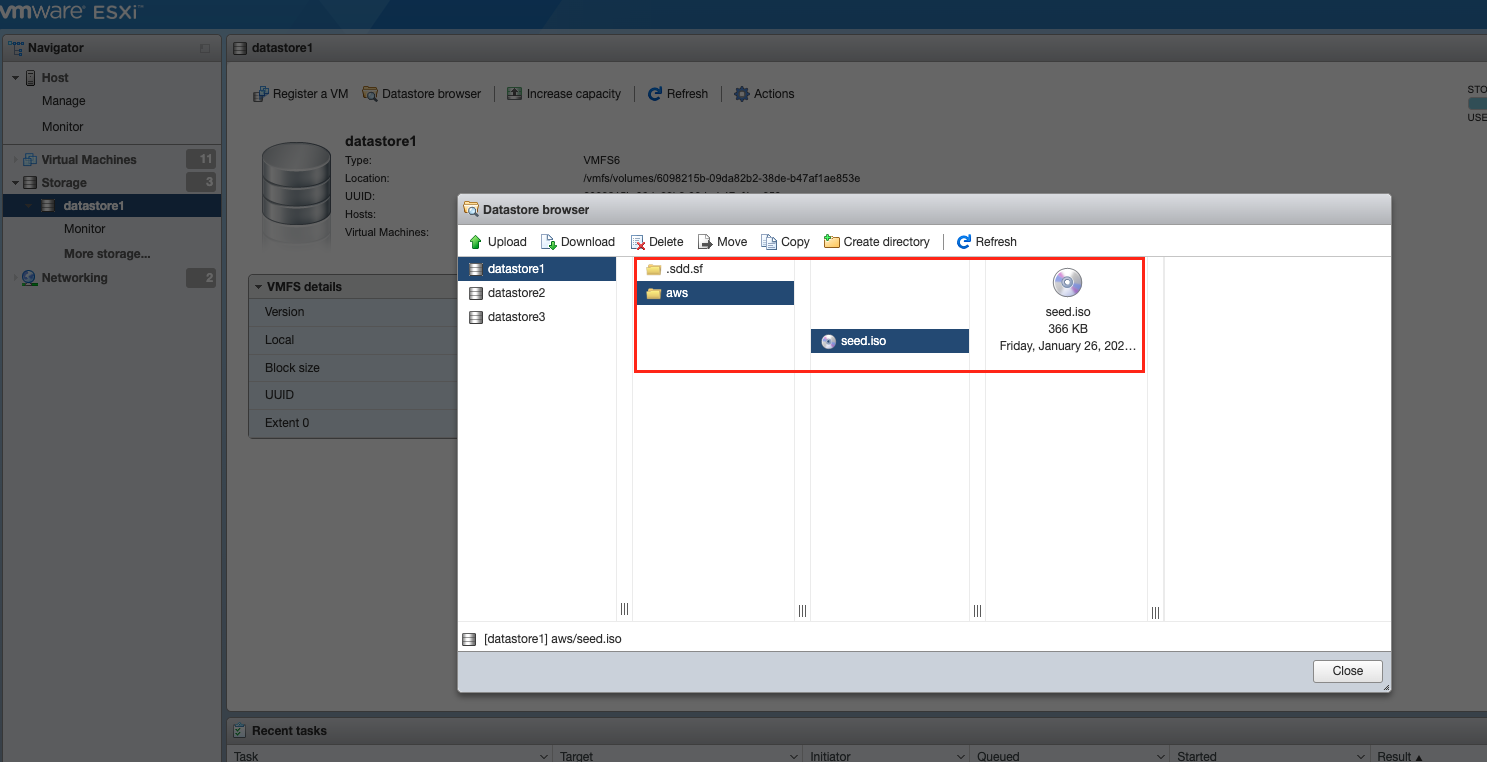
1- Upload the seed.iso to an existing datastore or create a new one:
2- Create a new VM to deploy a VM from OVF (Open Virtualization Format):
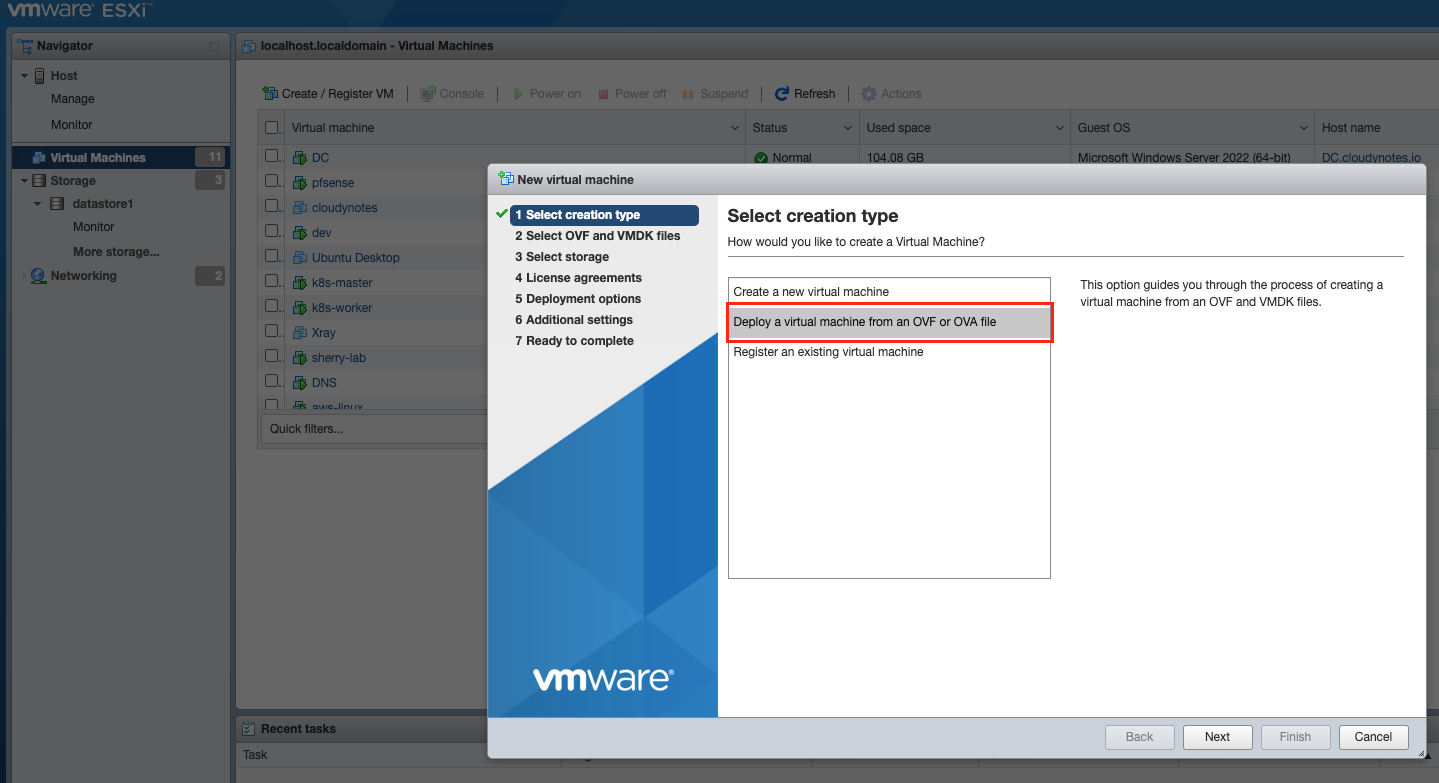
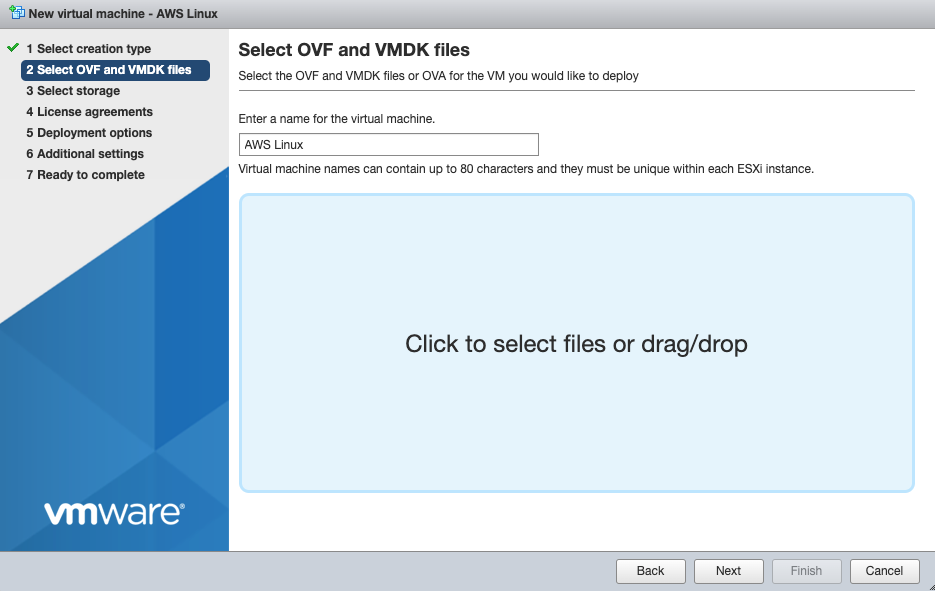
The VM starts automatically, so stop it after creating it.
3- Attach a CDROM to the VM and add the seed.iso to it.
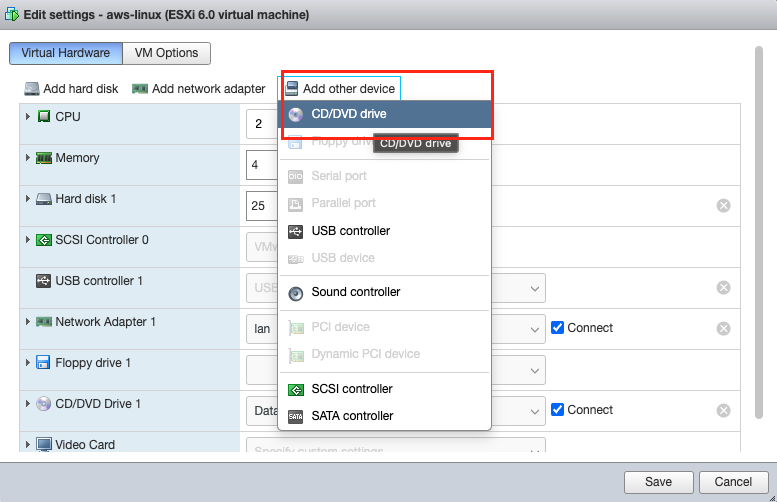
Remember to connect the CDROM after adding the device:
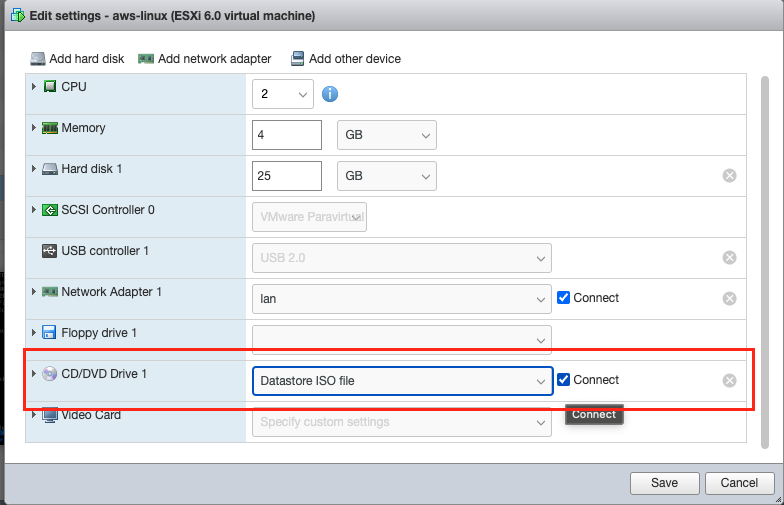
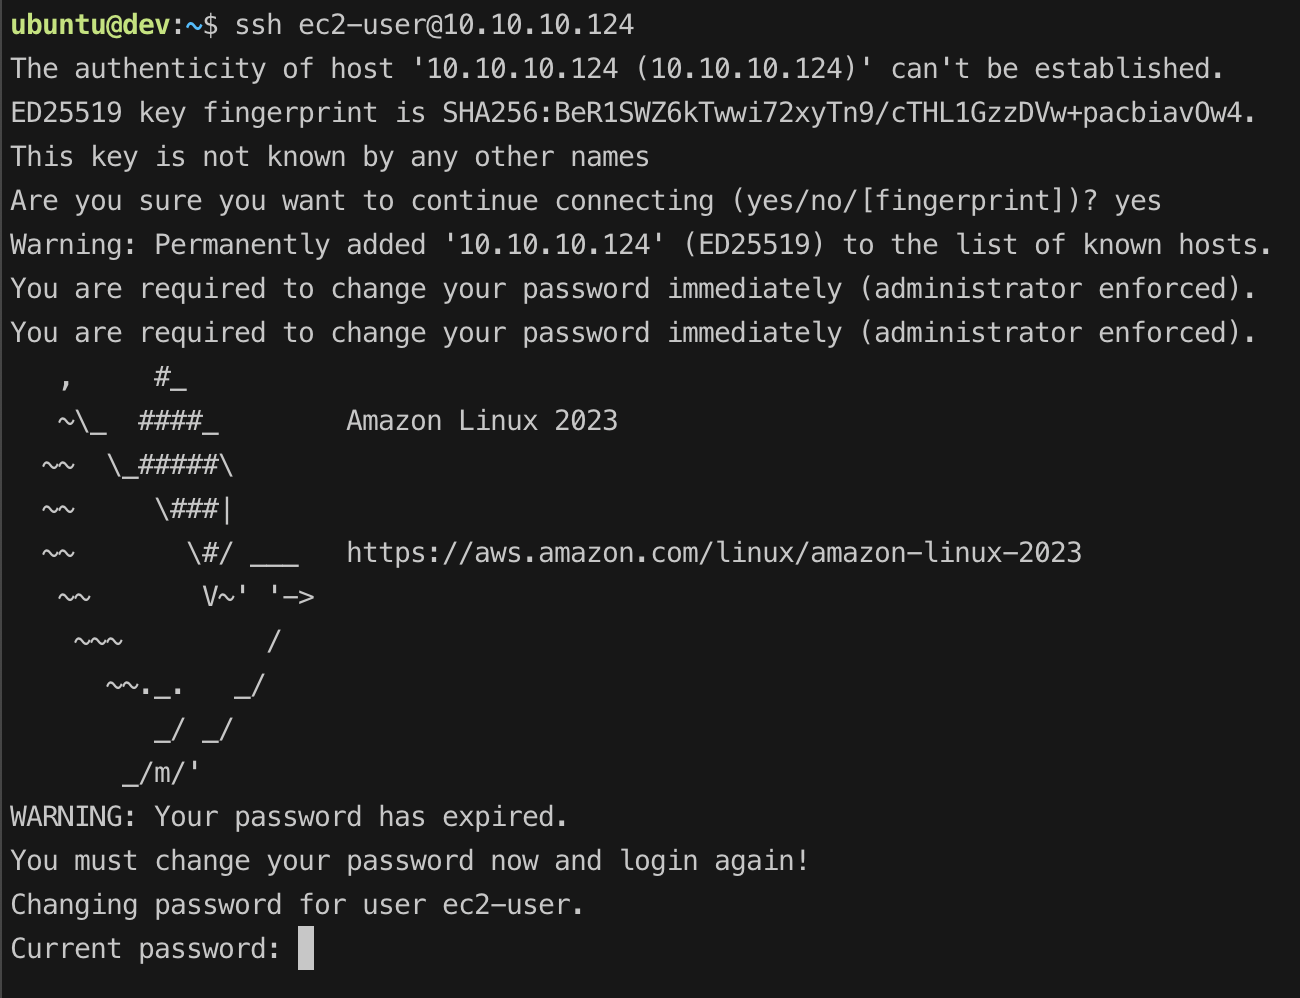
4- Start the VM. Once the VM has booted up, you should be able to SSH to it:
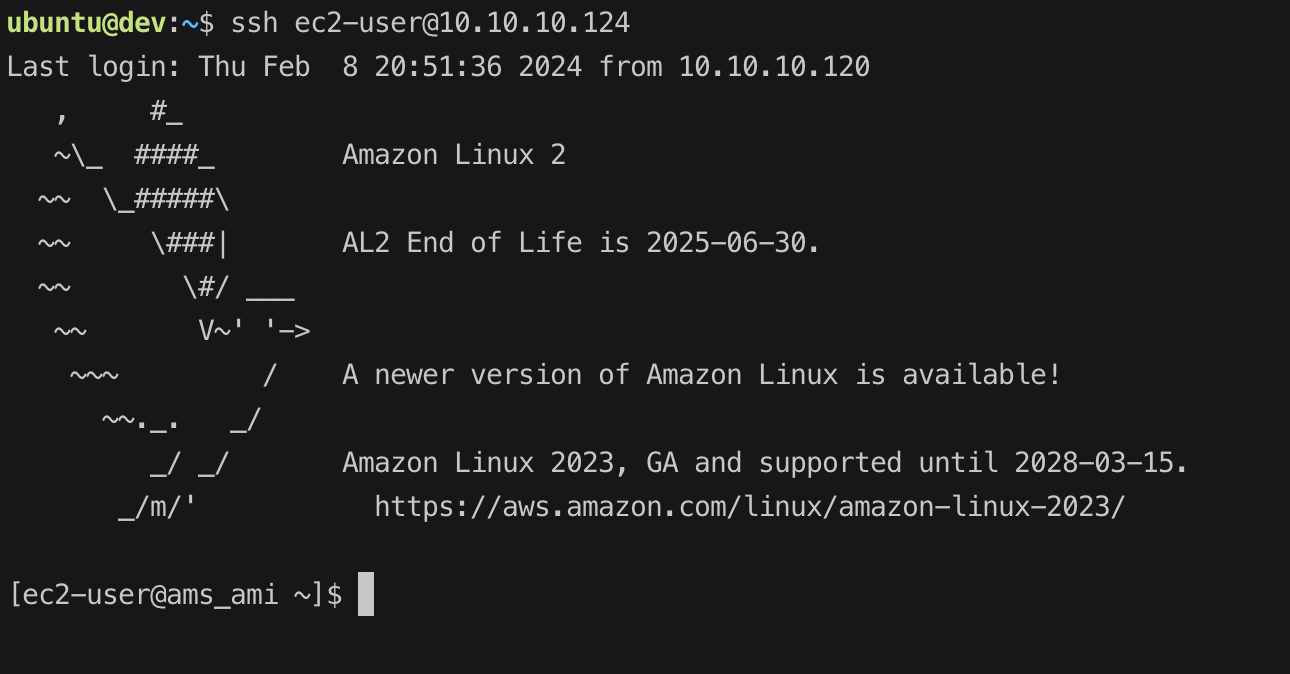
Based on the user-data configuration, the ec2-user password was set. If the password fails to meet the password policy criteria, the system prompts the user to change the password during the initial login.
